Dental veneers are thin shells made from porcelain or composite resin that are custom-designed to fit over the front surface of your teeth. These veneers are used to correct a variety of dental issues, including discolored, chipped, misaligned, or unevenly spaced teeth. In Vancouver, dental veneers are a popular cosmetic dentistry option due to their natural appearance and durability. By choosing dental veneers in Vancouver, patients can achieve a brighter, more uniform smile that can significantly boost their confidence.
The process of getting dental veneers in Vancouver typically involves three main steps: consultation, preparation, and application. During the initial consultation, your dentist will evaluate your teeth and discuss your desired results to determine if veneers are the right choice for you. Next, the preparation phase involves removing a small amount of enamel from the surface of your teeth to make room for the veneers. Impressions of your teeth are then taken and sent to a lab where the veneers are custom-made. Finally, during the application phase, the veneers are bonded to your teeth using a special adhesive, creating a seamless and natural-looking smile.
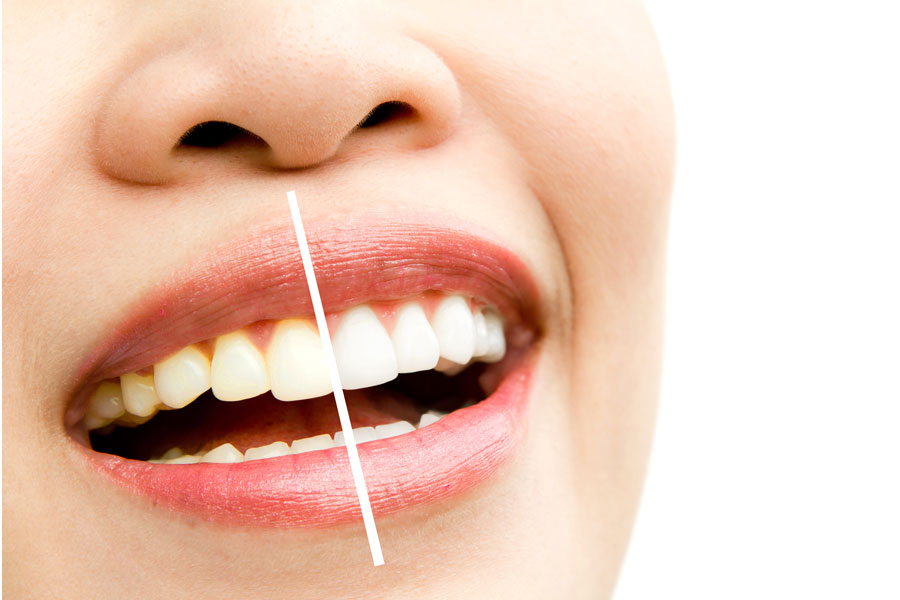
One of the primary benefits of dental veneers in Vancouver is their ability to provide a long-lasting solution to various cosmetic dental issues. Veneers are stain-resistant and can maintain their color better than natural teeth, which makes them a great option for individuals looking for a permanent whitening solution. However, proper maintenance is crucial to ensure their longevity. Patients should practice good oral hygiene by brushing and flossing regularly and visiting their dentist for routine check-ups. By taking these steps, those with dental veneers in Vancouver can enjoy a beautiful, healthy smile for many years to come.
The journey to acquiring dental veneers in Vancouver begins with an initial consultation and assessment. During this visit, your dentist will conduct a thorough examination of your teeth and gums to ensure that veneers are the appropriate solution for your dental needs. This step involves discussing your aesthetic goals, reviewing your dental history, and taking X-rays or impressions of your teeth if necessary. The dentist will also explain the entire process, including the costs, expected outcomes, and any potential risks, ensuring you are well-informed and comfortable with the decision.
Once you’ve decided to proceed with dental veneers in Vancouver, the next step is the preparation of your teeth. This involves removing a small amount of enamel from the front surface of the teeth to make space for the veneers. Typically, about half a millimeter of enamel is shaved off, which is roughly the thickness of the veneer itself. This process may require local anesthesia to minimize any discomfort. After the teeth are prepped, your dentist will take precise impressions of your teeth, which will be sent to a dental laboratory for the creation of your custom veneers.
The fabrication of your custom veneers is a critical step that usually takes one to two weeks. During this time, the dental lab uses the impressions of your teeth to create veneers that perfectly match the shape, size, and color of your natural teeth. In some cases, temporary veneers may be placed on your teeth to protect them until the permanent veneers are ready. These temporary veneers allow you to get used to the feel and appearance of the new teeth while ensuring your prepared teeth remain protected.
The final step in the process of getting dental veneers in Vancouver is the bonding procedure. Once the custom veneers are ready, your dentist will place them on your teeth to check their fit and color. Any necessary adjustments will be made to ensure a perfect fit. The teeth are then cleaned, polished, and etched to create a rough surface for the bonding agent, which helps the veneers adhere securely. A special cement is applied to the veneers, and they are placed on your teeth. A curing light is then used to harden the cement quickly. After the veneers are bonded, your dentist will remove any excess cement, evaluate your bite, and make final adjustments, resulting in a beautifully enhanced smile.
Maintaining your dental veneers in Vancouver requires diligent oral hygiene practices. Brushing your teeth at least twice a day and flossing daily are essential to keep your veneers and the underlying teeth healthy. Using a non-abrasive toothpaste will help prevent scratching the surface of the veneers. Regular dental check-ups and cleanings are also crucial to monitor the condition of your veneers and address any potential issues early on.
To prolong the lifespan of your dental veneers, it’s important to avoid biting into hard foods or objects that could cause damage. Chewing on ice, hard candies, or using your teeth as tools to open packages can lead to chips or cracks in the veneers. Additionally, if you have a habit of grinding your teeth (bruxism), it’s advisable to use a nightguard to protect your veneers from excessive wear and potential damage.
While porcelain veneers are resistant to stains, it’s still a good practice to limit the consumption of foods and beverages known to cause discoloration. Red wine, coffee, tea, and certain berries can stain your natural teeth, and although they may not affect the veneers directly, they can cause uneven coloring between your natural teeth and the veneers. Rinsing your mouth or brushing your teeth shortly after consuming such items can help maintain the uniformity and brightness of your smile.
If your teeth are stained or discolored due to lifestyle factors, development problems, age or other reasons teeth whitening may be the perfect solution. You have the choice between home bleaching and in surgery bleaching. The results varies from patient to patient depending on the condition and underlying shade of the teeth. However, they can offer a very aesthetic result with minimum side effects. A proper assessment by the dentist is important.
A: Tooth whitening is a process where the natural color of the tooth is lightened by the use of an oxidizing or bleaching agent. The bleaching agent is either hydrogen peroxide or carbamide peroxide.
A: The bleaching agent penetrates the porosities in the rod like structure of the tooth enamel and oxidizes the stain deposits between the prisms. With time, the bleach progresses to the dentine layer under the enamel and bleaches this in the same way. Dentine is dark in color and is continually deposited during the life of the tooth, which is why teeth get darker with age. It is therefore essential that the bleaching agent penetrates to the dentine to obtain maximum lightening effect and this is why many dentists prefer the slower home bleaching and also why it gives a more stable result.
A: There are two methods of bleaching – home bleaching and in surgery bleaching.
Home Bleaching The whitening product is applied to the teeth using a specially made tray, which fits into the mouth like a very thin gum shield. You will need an appointment with the dentist to take impressions to fabricate the custom “slips” and then you will carry out the remaining treatment at home. This entails regular applications of the bleach product to the teeth by inserting the filled slips for a period of approximately 45 minutes every day until the desired shade is achieved.
In Surgery Bleaching The effect of the bleaching product is accelerated with an energy source. The soft tissues around the teeth are protected by the application of a rubber coating and the bleaching gel is then applied directly to the teeth. A light activation system is then used to accelerate the whitening process for approx. 10 minutes after which the bleaching gel is removed and the process repeated until the desired shade is achieved.
A combination of the two procedures is often recommended to achieve a more pronounced, longer lasting effect. Bleaching with a home kit prior to in surgery bleaching allows more penetration of the bleaching gel and therefore deeper bleaching and brighter color. Bleaching with a home kit after in surgery bleaching helps to stabilize the color change achieved. It should be noted that penetration of the dentine by the bleaching gel is necessary to effect a stable color change and as the dentine tubules are in communication with the pulp chamber of the tooth which contains nerve tissue, there will always be some sensitivity experienced. For people with sensitive teeth most dentists recommend the gentler home bleaching technique.
A: Treatment results may vary depending on the original shade of the teeth. Teeth will tend to darken slightly over time but the bleaching can be repeated. The effect lasts for around 1 to 3 years, although sometimes it can last longer but the whiter shades are not stable and require constant refreshing. As mentioned above, some people find that their teeth are sensitive for the first few days after treatment but this wears off after just a short while.
A: Whitening can only lighten your existing tooth color- for a change to a specific chosen shade veneering is another option. Whitening also only works on natural teeth. It will not work on any type of false teeth. This includes dentures, crowns and veneers. If you have crowns, veneers or tooth colored fillings present these may need replacing following bleaching to achieve an aesthetic color match to your newly whitened teeth. A period of two weeks without bleaching should be left before any color matching for crowns or veneers takes place.
If a tooth has been root canal treated, the canal, which previously contained the nerve, will be re-opened and the whitening product inserted and sealed in place. The procedure is repeated on a weekly basis until the desired shade is achieved and then a permanent filling is placed in the back of the tooth.
Some teeth that have received trauma in the form of a bang become “internalized” and appear darker than the rest of the dentition. This color change is due to over-development of the dentine as a reaction to the trauma and eventually the root canal system is obliterated. It is not possible to bleach these teeth by any means and in this situation a veneer is necessary.
Some teeth are affected by systemic drugs such as tetracycline and are more difficult to bleach and may require veneers.
Different colors react differently to bleaching. Yellow shades respond better than grey shades.
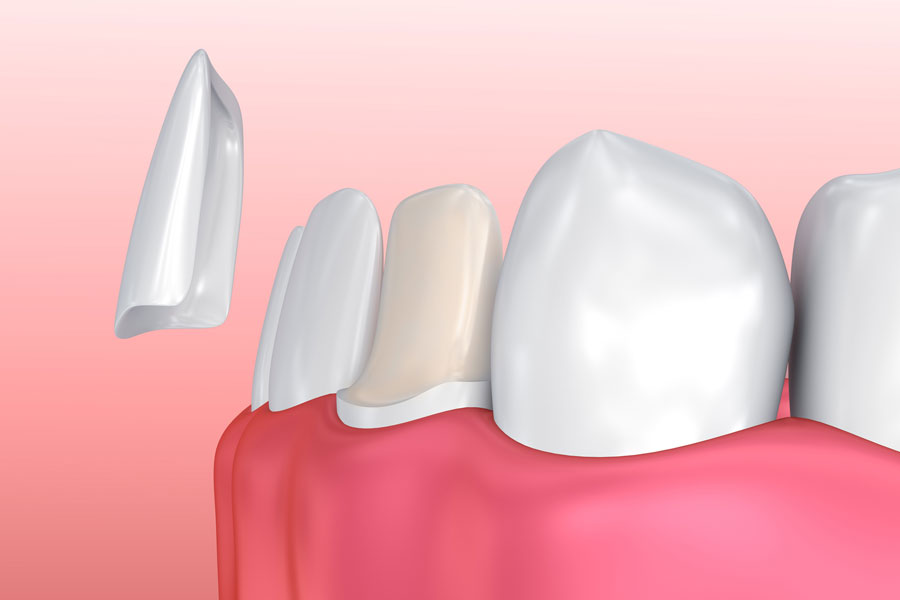
Many patients are discovering the benefits of dental veneers. Unlike a dental crown which covers the entire tooth, dental veneer is a thin covering that is placed over the front (visible) part of the tooth.
Dental Veneers are a popular treatment option for several reasons. They generally are placed on upper front teeth that are severely discolored, poorly shaped or slightly crooked. Veneers may be used to lighten front that are naturally yellow or have a grey cast and cannot be whitened by bleaching. Veneers are sometimes used to correct teeth that are chipped or worn. They also may be used to correct uneven spaces or a diastema (a large, noticeable gap between the upper front teeth).
Preparations for veneers are always dictated by three dimensional steps on how the final restoration is to be placed within the shape of the patient’s face, mouth, lips, and the entire gingiva. This is finalized by a smile design with patient inputs and requirements and to be personally verified based on use.
There are two types of dental veneers: resin-based composite veneers and ceramic veneers (sometimes called laminates).
Resin-based composite veneers generally are placed in one appointment. After the tooth is prepared or reshaped, the dentist carefully bonds and sculpts the composite material in a color that matches your other teeth. A special light is used to harden the composite. The veneer is smoothed and polished to look like a natural tooth.
Ceramic veneers are extremely thin shells made of a strong and durable dental ceramic. The dentist removes a small amount of enamel from the front and sides of the tooth. This makes room for the veneer and prevents the restored tooth from feeling or looking bulky or unnatural.
Next, the dentist makes an impression of the prepared teeth so that the shape of the preparations and surrounding teeth can be replicated in the dental laboratory. The dentist also looks for the shade that will best match or blend with the other teeth. The impressions are sent to a dental laboratory that makes the ceramic veneers to fit your individual teeth.
At the next visit, the dentist places the veneers on the teeth to check the fit and shape. After any adjustments, the teeth are cleaned and the ceramic veneers are bonded to the teeth with dental cement. Further adjustments may be done at a subsequent appointment.
Teeth must be healthy and free of decay and active periodontal disease. Veneers typically require less removal of tooth enamel than crowns.
Patients who clench or grind their teeth are not good candidates for veneers because the thin veneers may chip, break or peel. Avoid biting your fingernails and chewing on hard objects such as pencils or ice. Like any dental restoration, veneers can be dislodged over time and with wear. In that case, new ones might be needed.
No special maintenance is needed after having dental veneers other than good oral hygiene each day. Brush twice a day with fluoride toothpaste and clean between your teeth once a day with floss or another interdental cleaner.
A: Veneers make teeth look natural and healthy, and because they are very thin and are held in place by a special strong bond (rather like superglue) very little preparation of the tooth is necessary.
A: Veneers can improve the color, shape, and position of teeth. A precise shade of porcelain can be chosen to give the required color, to improve a single discolored or stained tooth, or to lighten front teeth (usually the upper ones) generally. Veneers can also be used to close small gaps or, if one tooth is slightly out of position, a veneer can sometimes be fitted to bring it into line with the others if orthodontics is not acceptable.
A: Natural colored filling material can be used for minor repairs to front teeth. This type of restoration is excellent where the tooth supports the filling, but may not work so well for broken tooth corners. There will always be a join between the tooth and the filling material. Crowns are used for teeth which need to be strengthened – whether because they have broken, have been weakened by a very large filling, have had root canal treatment, or the patient grinds their teeth.
A: Veneers should last for many years, but they can chip or break, just as your own teeth can. Small chips can be repaired, or a new veneer fitted if necessary. They may not be suitable for people who grind their teeth excessively.
A: Some of the shiny outer enamel surface of the tooth may be removed, to ensure that the veneer will not feel ‘bulky’ to the lips when it is bonded permanently in place. The amount of enamel to be removed is minimal and will be the same as the thickness of the veneer to be fitted, so that the tooth remains the same size. Once the tooth has been prepared, the dentist will take an impression. This will be given to our highly skilled technician along with any other information needed to make the veneer. The color of the surrounding teeth is carefully recorded and matched on a shade guide to make sure that the veneer will look entirely natural.
A: A veneer takes at least two visits. The first is to prepare the tooth and to match the shade, and the second one is to fit it. Bonding a veneer in place is done with a special adhesive, which holds it firmly on the tooth.
A: Because the preparation of the tooth is minimal, you will probably not need a temporary veneer. The tooth will look very much the same after preparation, but will feel slightly less smooth.